Image Map

Wednesday, December 31, 2014

Top Five from 2014 and a SALE!

I love the idea of ending 2014 with a look back at my year in blogging. It was been a rough road for me trying to juggle school, home, mommy-duties, church, and creating products along with blogging; which is why I was absent for a lot of 2014. I think that I'm finally getting into the swing of things and I am excited for the road that lies ahead. My goal for 2015 is to blog once a week and connect to at least one of blogger through commenting or some other form of social media once a day.

I decided to let you all be the judge of which posts made it into my top five. I was actually shocked to see the page views that some of my posts have accumulated since I first published them. These were definitely not the five I had in mind when I first came across Jivey's Top Five Linky. Before I get into the list, I just want to say thank you. Teachers are really the best. You all have been a great support and source of inspiration this year, both through conversation and through the opening of your classroom. I appreciate you all.

Now...Let's Roll


Also, Don't miss the New Years SALE happening in my TPT store right now! Just click the TPT button below!

See you next year!
Image Map

Monday, December 29, 2014

How We Do Fluency in 3rd Grade

This post was UPDATED in March 2018, please click HERE to be directed to the new post with updated links and products. 

Here in third grade, we practice fluency daily with:
-Word Lists
-Phrase Lists
-Passages/Running Records

My Mental Journey
I have had a love-hate relationship with fluency. As a third grade teacher, my students are subject to end of year, high-stakes testing for the first time. Fluency is not tested on these exams, students have all day to read the passages and test if they want. Comprehension is key. Not just on the end of year tests, but all year long comprehsnion is what is assessed and measured for mastery. Fluency has just been something we've done on the side, an add-on. I mean, third grade is the year students move from "learning to read" to "reading to learn", right?

Wrong. Well, at least for most of my kiddos. See, this year I have a group of very hard-working students who happen to be below grade level or the low end of on grade level. What I have found is that even though they can take as long as they would like on grade level comprehension assessments, they don't. Either they don't want to be the last one working or they just flat out lack the stamina. Fluency has been a crucial part of my reading instruction this year to help students close the gap while they are building stamina with testing. If they can read the words fluently and with accuracy, they will be less frustrated and they can spend more time making meaning from text since less time will be spent decoding. 

Fluency Centers
At the beginning of the school year, I had a great idea for fluency centers. I assigned the students partners based on the DRA assessment. I planned an elaborate schedule for when partners would visit the fluency center during Daily 5, asked for timers to be sent in, set up the center with directions, and had the students glue passages into their reading notebook for practice. "What a great idea," I thought; "This is going to be wonderful," I thought; "Other teachers will use this idea for sure," I thought; and then, reality hit. There I was in the middle of a reading group and all of a sudden, timers. Timers chiming and buzzing and beeping and absolutely driving.me.crazy. So, I came up with a new rule, you have 5 seconds to turn off the timer after it starts buzzing. Nope, that didn't help, I couldn't do it, I shut the center down.

Whole Group Fluency, Sort-Of
So, I invested all this time in creating fluency centers, partnering the students, and setting up a routine to find that it just didn't work for me. That's okay, teachers are like kids, we're all different and one thing won't work for everyone. I am just not the kind of teacher that can stay focused and deal with loud beeping noises interrupting the flow of my small groups. I knew I didn't want to stop fluency, like I said above, my students this year are still learning to read and they need it. I started squeezing in 5-10 minutes of fluency after our whole group lesson and quickly realized that we had found what works. After daily five, students grab their reading notebook and sit in their "fluency seat", next to their fluency parter. I set the egg timer on the Promethean Board for 1 minute (30 seconds in between each measure) and we get started with our routine.

Our Routine *All links are listed below
1. Word List from easycbm.com - Student pairs are numbered "student one" and "student two". The students have one minute to read as many words as they can. Student one reads the first word, student two the second word, and they continue to alternate words for the minute. Afterward, they have 30 seconds to record their progress on the graph on the back of the word list before we move on. If we have time we will do the word list again, with student two reading the first word so both students have an opportunity to read all of the words. (1-2 minutes of practice, 30 sec.-1 min. of transition time)
2. Phrase List - Students do the same procedure as above. They have one minute to read alternating phrases and then 30 seconds to graph on the back. We will do it a second time with student two reading first if we have time, if not, student two will read first next time. We practice reading the phrases properly (as questions, statements, or exclamations). (1-2 minutes of practice, 30 sec.-1 min. of transition time)
3. Passages from Ashleigh - I taught my students how to do running records. While one partner reads, the other tracks the errors. At the end of one minute, they calculate the amount of words read correct, graph their results, and switch. (2 minutes of practice, 1 min. of transition time)
TOTAL TIME: 6-9 minutes a day (once students are trained), with less time if you choose not to do all 3 measures in a day

Our New Fluency Center
One day, after working on a passage for over a week, I decided to model how to do a running record again. I read for a minute, using the document camera, and the students tracked my errors. I ended up getting much farther in the passage than any of them had and by the time the minute was over they were much more interested in hearing the rest of the story than pointing out my mistakes (which speaks volumes). I was so suprised that after daily practice on the same passage for over a week, none of them had actually finished reading the passage. That's when I decided to bring back the fluency center. 

So...I know I just did all that over-the-top ranting about how timers drive me crazy and now I'm bringing back the fluency center. I had to think of a way to make it work. I decided that during their time at the fluency center, students would just read lesiurely. Fluency doesn't always have to be timed, studies show that repeated readings are one of the best ways to build fluency. At the center, students take their time to read through their passage, phrase list, word list, and weekly poem. The goal is to simply get to the end of each measure to build context and familiarity. Since my students view timed fluency as a race, they love this extra practice time. One of my kids said they are practicing to win the challenge. The best part is, they were talking about beating their own score and not their partner.

Our Progress
My class has grown in leaps and bounds since we first started squeezing in fluency after our whole group lesson. I measure many of my kids with formal fluency assessments through the Aims Web program every other week. Most of the students I track were below or near their personal fluency target and now, they are close, at, or above. If fluency is a concern for your class as well, I really encourage you to put some practice in place daily or multiple times a week. It really does make a difference.

Check out some of the pictures from our Fluency Pockets below and scroll down for a freebie. Don't hesitate to leave me some of your thoughts for fluency in the upper grades.

Poem from The Teaching Oasis
Fluency Passage from Ashleigh


This is a picture of the back of the passage, where the students track their progress. When the graph is full and it's time to move on to a new passage, this page goes into their data binder. The back of the word list and phrase list also has a graph for tracking progress.


 Fry's Sight Word Phrases (link below)


Word List from Easy CBM

Interested in trying this out in your classroom? Grab the free pockets by clicking the link below. Also, check out some of these free fluency resources:

Easy CBM: word lists and passages by grade level
Fry Phrases: six lists with 100 words each
2nd-5th Grade Passages: from Mrs. Hultenius' site
1st-6th Grade Passages: McGraw-Hill
Fluency Pockets, Graphs, and Center Bookmark: from Adrienne, ha! Click the link and enjoy!


Sunday, December 21, 2014

Synthesis Interactive Notebook

I have been using interactive notebooks for everything these days and the kids and I are loving it! The new buzz word in my classroom is "pizazz"! One day, a student said that I always add pizazz to my notebook pages by coloring and writing neatly and now they have pizazz contests every time we work in our notebook. I don't think I've ever had a class that loves notebooking more than me, I have been on cloud nine!

I started the lesson by asking my third graders what they knew about synthesis. Some students had good guesses relating to photosynthesis, but no one knew what I was getting at. We have been talking a lot lately about “thinking about our thinking” and I told them synthesis was one way to do that. I brought in Russian nesting dolls and held the stacked dolls up. I asked if any students had ever seen them before and only a couple had. I told the students that the doll represented their thinking after they were done reading. Then, I opened up the doll and started unstacking the smaller dolls. The kids got SO excited, by the time I looked back up, they had all inched at least 2 feet closer! I held up the smallest doll and told the students that it represented their thinking at the beginning of reading a book, small. They don’t know much about the book yet and they can only connect to that little bit they know. Then I held up each doll as explained that as they read, they learn more, they can connect to more, their thinking gets bigger, and their ideas grow. They totally got this! I had them glue a title notes strip to a blank page in their reading notebook and we highlighted key words (this can be found here, if your are interested).


Next, I told the kiddos that we were going to practice synthesis together and I pulled out The Littlest Matryoshka by Corinne Demas Bliss. The students really enjoyed this book. I created paper stacking dolls for students to glue into their notebook as a flipbook. We stopped after the first page, dicussed/filled out the smallest doll, and glued it in the middle of the notebook page.Throughout the book, we stopped, discussed, and added pages to our doll flipbook. Each time, I reminded the students that their thinking was getting bigger, so the doll was getting bigger. 


After the book, when our flipbook was completely assembled, we wrote on the first page underneath the title strip. I had my students start their paragraph by telling me what synthesis was and then add their sentences from the dolls as their detail sentences. They were asked to make their closing sentence a feeling, thought, or opinion of the book. This lesson took 3 days to complete, but the students were engaged every day. After the first day, I had a group of pulled students re-enter the room and the rest of the kids immediately started telling them what synthesis was, what the dolls looked like, and how the two fit together. It was awesome!

Below are some pictures of our learning:


(The anchor below we used with the book Emma Kate by Patricia Polacco.)


I still have a week or more of teaching synthesis after we return from winter break and I would love any ideas you have! Thanks for stopping by!

Saturday, December 13, 2014

Guided Reading Organization

I absolutely love reading about how other teachers organize for productivity. I learned many tips and tricks since I started blog-hopping that I don't even know which of my ideas are original. But, that's okay! I thought I would share how I have my area set up, just incase organization makes any other teacher as happy as it makes me!


 My Guided Reading Table
 1. My Semi-circle table :)- This table makes me happy. Some teachers in my school have rectangle or circle tables, so every year before summer I make sure to plaster my name all over it so there is no chance of it walking off.
2. Water! The students love my plastic, mason jar water cup (Wal-mart). I have reusable star-shaped ice cubes inside that they can't get enough of (also Wal-mart). I also love my blue, damask, tile coaster that I got from Michaels for 2 for $1. I keep one on my reading table and one on my desk.
3. Supplies, Supplies, Supplies: This caddy is a letter tray that I sat pencil baskets inside of. I use it house everything I need for my reading groups.
4. Numbered chairs...not such a big deal. Last year, the group I had would fight over anything...including chairs. So, this year I numbered all my chairs: computer chairs, reading table chairs, students chairs for desks. It turns out this group actually gets along (Hallelujah!), and I am left with a room full of numbered chairs.
5. Our Re-reading Line-Up: The ledge behind my reading table is full with read alouds that we have already read as a class. The students love to reread these books during Daily Five.
6. Anchor Charts, Aweigh! I keep my most current anchor chart on my easel, the latest after that are behind my reading table for reference, and when I need space I retire them to my back wall.

My Make-Shift Supply Caddy
1. My time-to-stop-what-you're-doing-and-clean-up-now bell: It's actually a very polite sounding bell for something that basically means "move now".
2. Markers for coding text
3. Extra pencils and erasers
4. Red Pens
5. Calculator: This is more for me and not for the kids, if I find myself grading at the front of the room or trying to figure out my class' percent pass during our team meetings.
6. Squooshy Ball: One of my students frequently uses this ball as a fidget while working.
7. Highlighters: Notice the pink tape? Last year I had a lot of things walk away from me so I took the extra precaution this year (like the chairs, this was also unnecessary for this group).
8. Post-its, rubber bands, paper clips
9. Dry Erase marker, eraser, colored pens

Our Whole-Group Meeting Place
 1. My Spot: I used to sit in a rocking chair, but I couldn't fit the rocking chair in so close to the reading table and it was just a mess, so I simplified.
2. My laptop cart with a 200 chart poster to hide my goodies.
3. Behavior Management Clock: I got the idea of using an elapsed time clock for behavior management from Blair Turner and my kids love it! They need to earn 12 hours for the reward and the poster underneath says "Time Elasped, "Time Remaining", and "Reward".
4. Magic 5 reminders for carpet behavior
5. My beloved Promethean Board
6. Student Unfinished Work Slots
7. Emergency Bag and forgotten umbrellas crate
8. Bookbag hooks

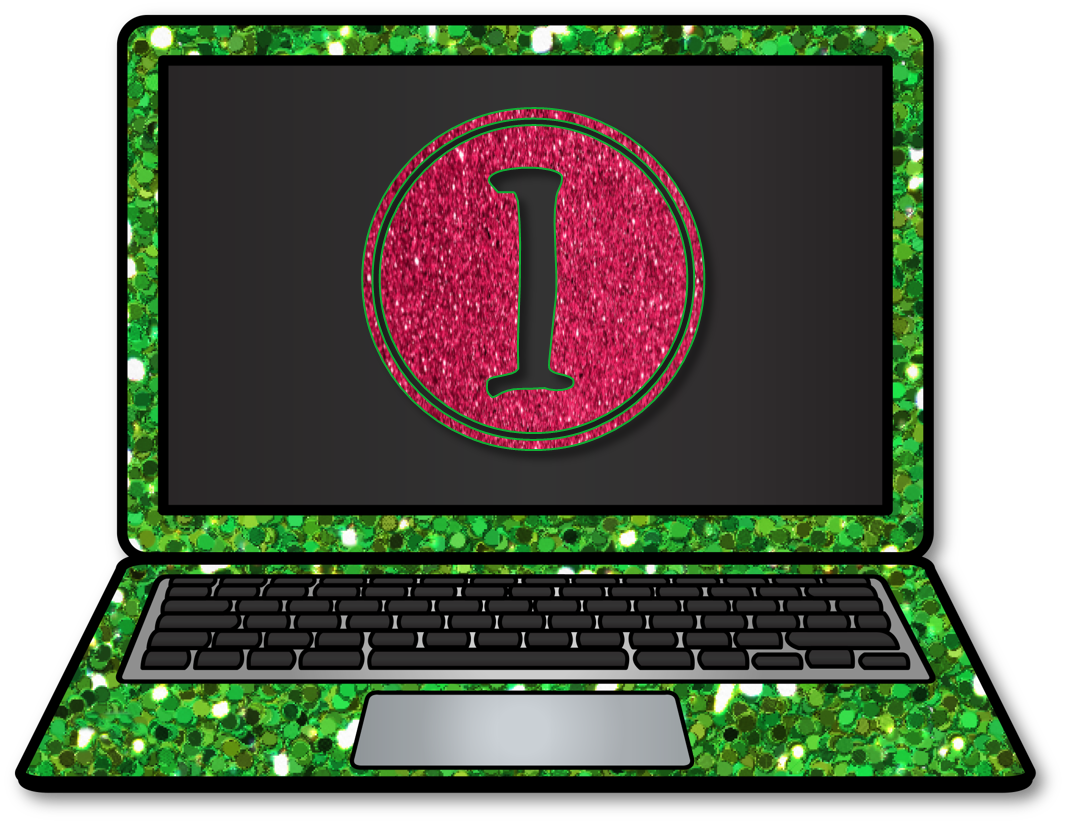
Laptop Cart: My mini-office on wheels
1. Laptop
2. Promethean Remote: It's actually embarrassing how many times I have lost this baby, now it must stay right in it's spot.
3. Markers for anchor charts and glue for interactive notebooks (I do a lot of modeling for interactive notebooks using my document camera before giving my students the activity, so I have to have all supplies on deck.)
4. Bookbox
5. Crayons kept in a snack case from the Dollar Tree (for interactive notebook work)
6. Interactive Notebooks for all subjects (science and social studies share a notebook)
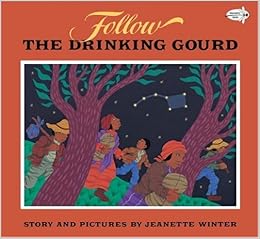
7. Class Read-Aloud Chapter Book: Right now we are in the middle of The Mouse and The Motorcycle
8. Document Camera
9. Way over in the corner of the picture, you can see my timer. I use this for fluency, cleaning up, partner activities, turn and talk, everything!

Under The Laptop Cart: My Secret Space
1 & 2. I keep student number cards in this $1 tin from Target (they are actually calendar date cards). I pick a number every time I ask a question or want someone to come up to the Promethean, I like to keep the kids on their toes! After I pick the card, I place it in the white tin. When all of the cards have moved over, I put them back and start again.
3. More supplies for my document camera work and teaching at the front of the room: teacher scissors, pencils, pens, dry-erase markers, highlighters
4. I bought this 1/2 crate from Wal-mart 2 years ago and I could not find one during school season this year. I love this crate because it is the perfect size! At the beginning of the year I used it for homework folders, but now I use it to house my materials.
5. Benchmark Literacy Teacher Manual
6. Anecdotal notes for reading groups: Each group has a prong folder with their notes and book.
7. My reading group notebook: The students have notebook they use during reading groups and I always get confused as to what group has done what writing or activity. I stole the idea from my wonderful ESOL teacher to keep a notebook along with the kids. I labeled a 5 subject notebook with a section for each group and I complete the notebook work along with the students.

That's it! Leave me a comment to let me know what you think or how you do things. I am always interested in organization ideas!


Thursday, December 4, 2014

Historical Fiction

I have been teaching third for four years (five if you count my graduate internship) and I have never explicitly taught historical fiction. Sure, I covered it as a part of genre, but that was it. Our county recently adopted a new program, Benchmark Literacy, which definitely has it's ups and downs. The program has us spending 2 weeks on historical fiction, and I have to say that I have loved it. Here's what we've been up to:

First I introduced historical fiction with the definition on my anchor. Since I like "well-put-together-looking" anchor charts, but don't have tons of time in my classroom before or after school to create them, I typed up the headers I wanted for my chart and just glued them on. If you're interested, you can find them here.
Next, we made connections by finding historical fiction picture books in my classroom library and discussing ones that they have already read. We found:


Then, we read one of my favorite historical fiction books, The President and Mom's Apple Pie by Michael Garland. It is about President Taft visiting a town for a flag pole ceremony and going on a hunt for the scrumptious food he smells. There is even a paragraph inside the front cover that tells about President Taft, which was helpful when we were separated fact from fiction.

We added to our anchor chart as we read.


Then, the students glued a historical fiction foldable into their reading notebook (you can also find that here) and copied from our anchor chart. We put nonfiction elements behind the flap and fiction on the notebook paper. When they were done, they had to add at least one fact to each category on their own and respond to the prompt strip glued into their notebook.


Peppe the Lamplighter by Elisa Bartone is a historical fiction book I just found. I plan on reading it to my students next week. It is a great story with amazing paintings/illustrations, but will take some discussion beforehand. I'm thinking I will have to discuss the concept of "Little Italy",  mention that some religions light candles for prayers, and briefly describe the flow of immigrants in 20th century New York.

I also have the historical fiction poster from my free genre poster pack on display!


Please let me know what books or activities you do while teaching historical fiction. Don't forget to swing by for my 1,000 follower freebie! See you soon!

Friday, November 28, 2014

Rounding Rollercoaster Freebie!

Hey Y'all! I hope everyone had a fantabulous Thanksgiving. Our day was wonderful, we hosted our first ever Thanksgiving at our house for my family, which was more like a lunch around noon. Then, we headed to Brandon's family's house for another meal around 5 for dinner. I definitely took in a lot of family and a lot of food today; you count on me hitting the gym tomorrow. We got home around 10:00, I put the little one to bed, took a shower, sat down at the computer, and realized that I have a whole new reason to be thankful:

I have 991 TPT followers!

I know to some of you phenomenal sellers out there, that is peanuts, but I am stoked! So, I decided a big THANK YOU freebie was the way to go. As soon as I get 9 more followers (come on, peeps!) I will post a brand new freebie. I have received a lot of feedback and questions about my Rounding Rollercoaster Interactive Math Notebook activity I posted on my blog a while ago, but I have been dragging my feet with adding it to my store. I keep trying to find a math bundle to include it in, but I am also in the midst of creating like 5 new products.

Sidebar: Are any other TPT sellers as fickle as I am? I get a new idea and it's like, I HAVE to start creating that now! I drop what I was working on to get started and before I know it, I have a bazillion unfinished products.

Anyway, thank you so much for following me. It is definitely an honor. Hopefully, you will be hearing from me soon with an email about a brand new freebie.


Sweet Dreams, Bloggyland!

My TPT Store: Adrienne Wiggins

UPDATE: You can find the FREE download here!

Tuesday, November 25, 2014

Anchor Charts Away!

Ahoy! I am finally back on the scene to share some anchor charts I have made so far this year. It's actually kind of embarrassing how long I have been neglecting blogging. This start to the school year has been one of the most stressful for me and my team. However, the dust is finally beginning to settle, we have got team planning underway (more to come on that later), and I am back!

Pinterest has definitely spoiled anchor charts for me. I am not yet one of those cutesy teacher that spends hours designing and decorating beautiful anchor charts, but I do feel completely unsatisfied with plain anchors. Blah! Below are some of the charts that my class and I have made so far this year, minus much of the artistry you can find on Pinterest. 

I am a huge believer that anchor charts are useless unless they are created during instruction, with the learners, which is one reason why I don't spend too much time making charts pretty beforehand. During student teaching, my mentor teacher told me that charts created and/or placed on the wall without being used during instruction are just wallpaper. The students won't pay attention to them or devote enough time to them to make meaning. 

Ok, now on to the charts!

I keep my current anchor charts on the front board and on my easel. As I need room, I retire my charts to the back bulletin board which is separated by subject. I staple new charts on top of the old so students can flip through to get to old charts when they need to.


Asking & Answering Questions

 
I use "The Stranger" by Chris VanAlsburg every year for teaching students how to question and they love this book! This anchor is actually unfinished, we go through and add answers to our questions as we read.

Author's Purpose

I layer my anchor charts on top of each other on my back wall so students can refer to them, this one was under the most recent chart. This anchor chart was completed over 3 days. The first day we talked about how authors think (the sentence in blue) and I introduced the 3 reasons author's write. Many of them remembered this from second grade, so I just wrote down the categories as we discussed. On day two, we defined each category, I wrote them on the chart, and we did a group activity. One day three, we sorted the examples I had pulled from magazines and the students glued them on the chart.

Fiction Story Elements

We learned about each of these one at a time and read a book to zoom in on the characteristic. I photocopied and posted the covers of the books for students to anchor their learning to and refer back to.

Analyzing Character

For this anchor, we read "A Bad Case of the Stripes" by David Shannon. The students have a list of character traits in their reading interactive notebook and we used that to stop throughout the story and analayze Camilla's character. I actually used this book as a two-fer with visualization. I didn't show them the pictures as I read and I had them create their own pictures along the way. They couldn't wait to compare their illustrations to the book. The awesome daily five posters to the right are from the awesome A Year of Many Firsts.

Prefixes

My county specifically lists the 7 prefixes that third graders as responsible for knowing. I per taught each prefix and glued the definition on the anchor chart throughout the week as we learned. Once we covered all of the prefixes, I assigned each student a prefix, gave them an apple, and told them they had to think of a word to add to the chart. The super cute prefix signs are from Rachel Parlett and they come in so many cute themes!

The rest of my charts don't need as much explanation, enjoy!

Making Change


Number Sense


Data and Graphing


Animal Adaptations


Famous Americans


School Expectations


Class Expectations


Data Wall


Behavioropoly


Thanks for stopping by!