So, I really haven't posted since Spring Break! I can't believe it either, it was actually part craziness and part laziness. I am excited to report that I have successfully finished my first year of teaching!!! Whew! Our last day was June 15th and I'll share more about that in a post later. Although I have been MIA from blogging, I have still been reading all of the wonderful posts that you all have been writing. The post that actually motivated me to click on the pencil icon and (finally) write a new post was
THIS one by Terri over at
The Creative Apple. Terri explains how she uses her curriculum binder, shows us some pictures, and even gives us some freebies. I can be a little OCD when it comes to organization in my classroom, so I thoroughly enjoy reading about how other teachers organize. I really just want to share a little about my binder last year and a lot about my organizer, which I'm planning on getting bound at Staples, for next year.
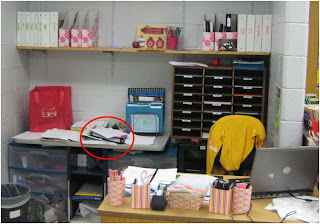
This is a picture of my desk at the beginning of October. For the record, my desk is usually VERY neat, as I mentioned earlier I am all about an organized classroom. That being said, I have no idea why I would take a picture of my desk while it was in this state, but nonetheless, you can see the pink binder I used as my organizer hiding on the table behind my desk. The papers laying on top of the binder were always there, not the same papers, but always some type of papers that needed to go in. I eventually just put the binder in my filing cabinet and would continue to place papers that needed to go in on top of it. However, if I needed any paperwork from the first two months of school I new exactly where to find it! My goal this year is to make my organizer more functional and practical so that it will last throughout the year and continue to keep me organized.
Since my husband is currently trying his best to pull me away from the computer so we can go out and get lunch, I will just copy the text from the user guide of my organizer pack. This ended up being a 70 page document and I have pictures of the layout below. I hope you can find some of the information about how I organize helpful. You can find the organizer on
TPT (check out the preview download for a closer look at some of the pages) and
Teachers Notebook.
**Please let me know if the formatting is off.
I created the organizer pages in a way that allows you to use them in any manner you please. Below I will share how I use the planner throughout the year to keep myself organized.
First Things First:
When I first started putting together pages for an organizer, my intent was to hole-punch the pages and put them in a binder. I found that by October I had stopped using my organizer because a binder was just too big and bulky to be easily accessible for me and for me to carry everywhere (this is my personal opinion because I wanted something I could easily carry everywhere). SO, this year I plan on waiting until I have all the paperwork, probably around the end of September/beginning of October, and then taking my pages to Staples or Office Max to have them spiral bound into a book. The pros of getting the pages spiral bound is that the information will be a lot easier for me to use, harder to misplace, and more convenient to take with me. The con of getting the pages bound is that I can not add to the organizer throughout the year. That being said, if you plan to get the organizer spiral bound, make sure you have extra copies in each section and a couple of blank or lined pages for information that might come up.
Layout:
Color Scheme
|
The entire pack is done in black and white on purpose. Since I plan on binding the pages into a book, I will not be using dividers. I plan to print the section title pages ON COLOR PAPER (I prefer the neon astrobrights) so that I can tell where different sections start easily, without having to flip through the entire book. I plan on printing the category dividers on bright pink paper and the section dividers on different colors per section (planning dividers will be pink, communication dividers will be green, etc.).
|
Rectangular Border Pages
|
Categories are marked by pages that have a rectangular border. If I was putting the pages into a binder, these would be what I named the divider tabs.
|
Star Border Pages
|
Sections are marked by pages that have a star border. The entire document is already in order, so all the star pages that come after the rectangular “Planning” page belong in that section, all the star pages that come after the rectangular “Communication” page belong in that section, etc. Of course you are free to switch up the order, omit, or add sections. This method of organizing is what I found the easiest for me since I tend to focus on how details relate to the big picture.
|
Repetition
|
Some divider pages are repeated and reworded, this was in order to allow you to choose the best page to fit your school and management style.
|
About the Pages:
Some of the pages are self-explanatory and need no further information, I will skip over those. If you have any questions about how to use a page, please contact me.
Parent Contacts
|
The reason I mentioned that I will have my book bound toward the end of September/beginning of October is because I have to wait for all of the pages to come back to me. Inputting all of the information myself into my organizer would be tedious, frustrating, and never-ending, as it would probably never get done. I send the parent contact sheet home with students on Meet the Teacher Day or the first day of school. The parents fill out the information (which I’ve found can differ from the information the school has on file) and return the sheet with their student.
*Tip: If binding your organizer, always include a couple extras of these sheets for new students you may get throughout the year. You can send home a blank copy with them and just input it yourself into your organizer.
*Tip: I copy this sheet on the back of the parent communication log sheet. I’ve found this to be helpful because all the paperwork is in one place when I need to contact a parent. If you do this, you will not need to print the “Communication Log” section divider. It would be smart to include extras of just the communication log in this section as there will be parents that will cause you to quickly run out of spaces.
|
Conference Sheets
|
I used to use a conference sheet that was a lot simpler than this one, but I found I was getting exhausted from meticulously filling in the “strengths”, “weaknesses”, and “ideas for home" boxes. Since I found myself writing the same things, I figured I could type it right on the sheet and make it into a checklist. For the daily routine checklist, I just put a checkmark if a student is doing well in that area and write my concerns if they are not. I was a little worried that making the conference checklist so involved would also make it less personal, but then I reminded myself that the sheet is just to be used to guide discussion. The conversation about every child will be personal, the checklist will just help me make sure I hit all the necessary areas and let parents know how they can support their learner at home.
*Tip: If binding your organizer, put blank forms in your book and then just fill them out and copy each front/back before conferences (Even if parents don’t come to conferences, I will send 2 copies home with their child and request that one copy be returned with a signature). I have the parents sign the copy in my book and then give them the photocopy to take home.
*Tip: Make sure you have enough for all of your students and all of the conference times throughout the year, as well as some individually scheduled conferences.
|
Good News Notes
|
In college I learned to get in touch with parent within the first couple of weeks of school to let them know something positive about their child. My professor considered this “putting money in the bank” for a time when you had to “make a withdrawal” and contact parents about something not so nice. I try to send home a nice note to a couple students a week. I keep track to make sure everyone is getting notes. In the “type” column I write whether I contacted parents by phone, email, written note, postcard, or face-to-face.
|
Class Information Category
|
Some other sheets that I will receive at the beginning of the year and include in this category are:
-School-wide lunch/recess schedule
-Alternative lunch schedule for early release or late arrival
-Alternative Specials schedule
-Student Grouping Roster (This is the first student roster we will receive. It has the breakdown of each student’s demographics.)
-Student Addresses
|


A closer view of my conference sheet.